Previously I hosted my website in a t2.medium EC2 instance and it's been underused, so I decided to resize down to a t2.micro. This post covers how to move your current website to a new EC2, and the major efforts are on AWS config and Nginx-Gunicorn-Flask setup.
Set up new EC2 instance
Since I assume you've already got 1 EC2 running, we just need to launch a new smaller EC2 and re-use some of the set up from original EC2. It's relatively straight forward:
Launch EC2 instance -> chooose Image with name "Anaconda with python3" (free tier) -> t2.micro -> make sure you specify the Key Pair (!!)
Several config from previous EC2 will be re-used:
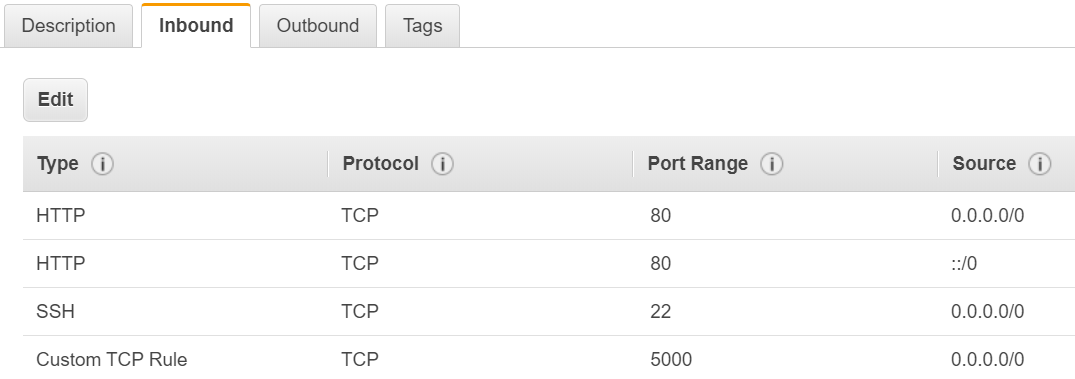
1. Security group:
Click on your EC2 -> Networking -> Change Security Groups, then assign your new EC2 the same group as the original EC2. Also make sure the EC2 is open for ssh, https and tcp like this:
 2. Elastic IP (this is important since it saves you efforts on re-config your domain host to talk to your new EC2):
Under your EC2 console -> from bottom left Elastic IPs -> Actions -> Dissociate Elastic IP address -> Associate Elastic IP address to your new EC2.
Set up website repo
Since you've set up a key pair for your new EC2, you will need the corresponding private key to SSH into the instance.
SSH into your instance -> clone your website repo -> activate your env (re-create the env from your env.yml if needed).
At this moment you want to make sure your web can run. Here I'm using Flask, so just
python app.py
and you should see the server is up and sending some messages. If you type in the IP address and port in your local browser and you can see your website, then the repo part is working properly. Next is to config the server app Nginx + Gunicorn.
Nginx and Gunicorn
The main reason for using Nginx + Gunicorn is network performance, since the default Flask mode only supports 1 thread (details).
The order for getting request and giving response from the server will be: outside world -> nginx -> Gunicorn -> Flask. Since we've tested Flask, next we want to set up Gunicorn and test it's working.
Since you've re-created your original environment where you used gunicorn before, you should already have gunicorn. Then enter your webapp directory and do:
gunicorn app:app -b 0.0.0.0:5000
This tells gunicorn to go the app.py (first app) to get the app variable in that source file as server(second app), and expose it to public (0.0.0.0 as opposed to the default localhost) and listen to port 5000. After that, from your local machine's browser, go to your-ec2-ip:5000, and you should be able to see your website. Refer to details if you forgot where is the gunicorn config.
After Gunicorn is successfuly set up, the last is Nginx configuration. Nginx is an open source server app under linux (the other famous one is Apache). Since the Linux Image we used for ec2 is not a Ubuntu distribution (CentOS), we first need to install Nginx.
$ sudo yum install epel-release
$ sudo yum install nginx
$ cd /etc/nginx/
You can see the nginx files:

The following is to config nginx directly, but after that you can also follow the Ubuntu style by creating the sites-availabel and sites-enabled directories (details). Here you want to modify the nginx.conf:
sudo vim nginx.conf
You will see variables like user and blocks like events, http like this:
user ec2-user;
# some config...
http {
        log_format  main  '$remote_addr - $remote_user [$time_local] "$request" '
                      '$status $body_bytes_sent "$http_referer" '
                      '"$http_user_agent" "$http_x_forwarded_for"';
        access_log  /var/log/nginx/access.log  main;

        sendfile            on;
        tcp_nopush          on;
        tcp_nodelay         on;
        keepalive_timeout   65;
        types_hash_max_size 2048;
        include             /etc/nginx/mime.types;
        default_type        application/octet-stream;

        server {
            # some config
        }
}
See link for details and syntax. What we want to change is the server block inside the http block (replace the original server block with the following):
 server {
                charset utf-8;
                listen 80;
                location / {
                        proxy_pass http://localhost:8000;
                        proxy_set_header Host $host;
                        proxy_set_header X-Real-IP $remote_addr;
                        proxy_set_header X-Forwarded-For $proxy_add_x_forwarded_for;
                }
                location /static {
                        alias /path/to/webapp/static/;
                }
        }
Once you set it up, restart nginx by
sudo /etc/init.d/nginx restart
and you should see OK message. After that launch Gunicorn as previous by without -b 0.0.0.0:5000, and in your local browser type in EC2 ip without the port. If you can see the website normally, then everything is set up correctly! From my experience, these are some commonly seen roadblocks:
- Didn't see my website. Instead, saw a default Nginx page.
Cause: the Nginx server config is using a default one rather than your custom one.
Solution: under/etc/nginx/remove everything containingdefault, and make sure theserverblock innginx.confis your custom one. - Saw 403 forbidden
Cause: the Nginx server cannot access your resource (can double check by looking at your brower dev console)
Solution: config Nginx's user to be the same as your resource files. details - Can see words but not images
Cause: Nginx limits the resource file size to be passed
Solution: config allowed resource size. details
Once made sure Nginx is set up and your website is up running. We want to run Gunicorn in the background rather then attached to terminal, by:
gunicorn app:app -D
And this concludes the set up within EC2. All after will be config between EC2 IP and your domain host. Fortunately, if you set up Elastic IP and Route 53 in AWS, you don't have to config your domain provider, since the communication from your domain to EC2 is via Elastic IP and remains the same. So, now you are officially good to go.
Comments